Tag: baking

  • Soft Homemade French Bread Loaves + Hoagie Roll Option

    Soft Homemade French Bread Loaves + Hoagie Roll Option

    There is nothing—nothing—like the smell of fresh homemade bread baking in your kitchen. It instantly makes your home feel warmer, cozier, and just… happier. And this recipe? It’s one of my absolute favorites because it’s simple, reliable, and incredibly versatile.

    This homemade French bread comes out soft, squishy, lightly golden, and perfect for serving with dinner, slicing for sandwiches, or turning into hoagie rolls. It uses everyday ingredients, requires no fancy tools, and makes two full loaves — or one loaf and a batch of hoagie rolls like I did!

    If you’ve been looking for a beginner-friendly bread recipe that works every time, this is the one.


    Ingredients

    • 5–6 cups flour
    • 2 ¼ cups warm water
    • 2 tablespoons sugar
    • 1 tablespoon yeast
    • ¾ teaspoon salt
    • 2 tablespoons oil

    🥖 How to Make Becky’s Homemade French Bread

    1. Activate your yeast

    Pour the warm water and sugar into a large mixing bowl.
    Sprinkle the yeast on top and gently stir.
    Let it sit for a few minutes until it starts to bubble and foam — this means the yeast is alive and ready to work its magic.

    2. Add oil, salt & flour

    Stir in the oil and salt.
    Slowly add 5 cups of flour, mixing until everything is well combined.

    3. Knead the dough

    Turn your dough out onto a lightly floured surface.
    Use the remaining 1 cup of flour during kneading as needed.
    Knead for 4–5 minutes, adding flour only until the dough is soft, smooth, and just a little tacky — not sticky.

    4. Shape your loaves

    This recipe makes 2 full French bread loaves.
    Shape them however you like:

    • 2 large French loaves
    • 8 hoagie rolls
    • or 16 small bun-sized rolls

    5. Let rise

    Place your shaped loaves or rolls on a greased baking sheet.
    Cover with a towel and let rise for 1 hour, or until visibly puffy.

    Score the tops if desired — this helps the bread expand beautifully while baking.


    🔥 6. Bake

    Bake at 375°F for 20–25 minutes.

    For an extra golden brown, soft top:
    Brush with melted butter during the last 10 minutes of baking.

    The smell when these come out of the oven… heavenly.
    The texture is soft, warm, and perfectly squishy.


    🍽️ How to Use This Dough

    This dough is incredibly versatile. Try using it for:

    • French bread
    • Hoagie rolls
    • Sub sandwiches
    • Garlic bread
    • Bread bowls
    • Dinner rolls
    • Picnic sandwiches

    Once you make it, you’ll realize how many meals it fits into.


    💛 Final Thoughts

    This homemade French bread is one of those recipes that instantly becomes a family staple. It’s easy, forgiving, and makes your whole home smell amazing. Whether you’re making classic French loaves or hoagie rolls for the week, this bread is soft, warm, and absolutely delicious.

    If you make this recipe, I’d love to hear how it turned out for you!

  • 7 Pantry Staples Every Homesteader Should Have Year-Round

    7 Pantry Staples Every Homesteader Should Have Year-Round

    A well-stocked pantry is the heartbeat of any homestead. Whether you’re deep in canning season or throwing together a last-minute dinner, having reliable staples on hand makes everything smoother.

    Over the years, I’ve learned that there are a few items I never let myself run out of — simple, versatile ingredients that stretch meals, preserve food, and keep us prepared for whatever comes our way.

    Here are my 7 must-have pantry staples that every homesteader should keep stocked year-round.

    1. Dried Beans and Lentils

    They’re affordable, filling, and incredibly versatile. Dried beans and lentils can be used in soups, stews, casseroles, or canned for quick, ready meals. Lentils cook faster and don’t need soaking, which makes them perfect for those days when you forget to plan dinner.

    💡 Tip: Store in airtight jars or food-grade buckets with oxygen absorbers to extend shelf life. Rotate them yearly for freshness.

    2. Flour and Grains

    Flour is the base for so many homestead staples — bread, pancakes, biscuits, tortillas, you name it. I like to keep both all-purpose and whole wheat flour, along with oats, cornmeal, and rice (more on rice below!). These shelf-stable grains can carry you through busy seasons or lean times.

    💡 Tip: Freeze flour for 48 hours before long-term storage to prevent pests. Then transfer it to airtight containers.

    3. Rice

    Rice deserves its own category because of how versatile and long-lasting it is. It pairs with nearly any meal and stores beautifully. We keep both white rice (for long-term storage) and brown rice (for flavor and nutrition, though it has a shorter shelf life).

    💡 Tip: Store rice in sealed containers or mylar bags with oxygen absorbers. A 5-gallon bucket can hold around 35 pounds — that’s a lot of meals!

    4. Salt — The Ultimate Preserver

    Salt isn’t just for flavor — it’s a tool for survival. It’s essential for curing meat, fermenting vegetables, and preserving food. I always keep sea salt for everyday cooking and pickling salt for canning.

    💡 Tip: Skip iodized salt for canning projects — it can cloud your jars and change the taste.

    5. Home-Canned Meat and Broth

    Few things make me happier than seeing rows of home-canned meat and broth on my shelves. It’s convenient, shelf-stable protein ready for any meal. Whether it’s turkey, chicken, or beef, I can throw together soups, dips, and casseroles in minutes — no thawing required.

    💡 Tip: Check out my post on From Freezer to Pantry: How I Pressure Can Turkey for Long-Term Storage for exact times and steps.

    6. Tomatoes and Tomato Products

    Tomatoes are one of the most versatile ingredients in the pantry — think sauces, soups, stews, chili, and salsa. Every year, I can plenty of diced tomatoes, tomato sauce, and paste so we’re set until next harvest.

    💡 Tip: Add bottled lemon juice or citric acid when canning to keep the acidity safe for storage.

    7. Vinegar

    If I could only keep one “multi-tool” in my kitchen, it would be vinegar. It’s used for cleaning, pickling, cooking, canning, and even animal care. I keep both white distilled vinegar (for cleaning and canning) and apple cider vinegar (for marinades, dressings, and even goat care!).

    💡 Tip: Store vinegar in a cool, dark place. It lasts indefinitely when sealed properly.

    Final Thoughts

    A well-stocked pantry is about more than just food — it’s about security, simplicity, and peace of mind. When you build your pantry with intention, you’re not just preparing for busy seasons; you’re investing in your family’s independence year-round.

    These seven staples have earned a permanent spot in my pantry because they’re versatile, affordable, and practical — the kind of ingredients that keep our homestead running, no matter the season.

    What’s one item you can’t live without in your pantry? Let me know in the comments below!

  • The Nikki Special: Big-Batch Kielbasa Rice Dinner (Dump-and-Go)

    The Nikki Special: Big-Batch Kielbasa Rice Dinner (Dump-and-Go)

    Some recipes come from cookbooks… some come from Grandma… and some come from a coworker named Nikki who casually hands you a recipe one day and changes your entire dinnertime routine forever.

    This dish—which we lovingly call The Nikki Special—has gone through many tweaks and adjustments over the years. At this point, it’s very much my version… but the name sticks because it makes me smile every time.

    And fair warning: this makes a BIG batch.
    Like, “feed the whole family for dinner AND have lunches for the rest of the week” big.
    It’s hearty, flavorful, comforting, and ridiculously easy to customize.

    Let’s dive in!


    Ingredients

    • 2 boxes Rice-A-Roni or 2 cups uncooked white rice
    • 1 whole onion, chopped
    • 3 bell peppers, chopped
    • 2 pint jars of homemade chicken broth
      (About 4 cups — you can do half broth, half water if needed)
    • 1 kielbasa sausage, sliced into bite-sized pieces
    • 1 can corn, drained
    • A handful of cheese, your choice (cheddar, Colby Jack, etc.)

    Optional add-ins:

    • Garlic (fresh or powdered)
    • Green onions
    • Peas
    • Mushrooms
    • Anything you’d throw in a stir fry

    🍳 How to Make the Nikki Special

    1. Cook your rice

    If you’re using Rice-A-Roni, follow the instructions on the box—just swap the water for broth for extra flavor.

    If you’re using white rice, you’ll want to season it yourself since it doesn’t come with a flavor packet. Add:

    • Salt
    • Pepper
    • Garlic powder
    • Onion powder
    • Or your favorite all-purpose seasoning blend

    This step ensures the rice is flavorful and not bland once everything comes together.

    2. Add your veggies while the rice cooks

    Throw the chopped onion and bell peppers right into the pot while the rice cooks.
    No extra pan, no extra dishes—my kind of cooking.
    They soften perfectly and add tons of flavor.

    3. Add the kielbasa

    Once the rice is done, stir in the sliced kielbasa.
    It warms through quickly and gives the dish a hearty, smoky bite.

    4. Add the corn + cheese

    Stir in:

    • 1 can of corn
    • A handful of shredded cheese

    Mix until the cheese melts and everything is combined.

    5. Taste & tweak

    Now channel your inner Ratatouille.
    Smell it. Stir it. Taste it. Adjust seasonings.
    Add more cheese, garlic, veggies—whatever makes your heart happy.

    And viola! Dinner is served.


    🍽️ Why My Family Loves This Recipe

    • Makes a HUGE batch
    • Reheats beautifully
    • Has everything in one pot (rice, veggies, protein, cheese!)
    • Easy to customize
    • Comfort food at its finest

    It’s one of those meals that somehow turns out great every single time—even when you wing it( which is essentially every meal in my household). Let me know if you try this one, and what you thought!

  • Best Homemade Waffle Recipe with Quick Homemade Maple Syrup

    Best Homemade Waffle Recipe with Quick Homemade Maple Syrup

    There is nothing better than a cozy breakfast at home—especially when it involves fresh, fluffy homemade waffles and warm maple syrup bubbling on the stove. This is one of those recipes that looks and tastes fancy, but it’s actually incredibly simple to make. And if you’ve seen any of my dump-and-go style recipes before, you already know I’m not about extra dishes or complicated steps.

    Just toss it all together, plug in the waffle iron, start your syrup, and boom—breakfast magic.

    These waffles are soft on the inside, crisp on the outside, and perfect for adding chocolate chips, fruit, whipped cream, or whatever your family loves. And the homemade syrup? Let’s just say my youngest goes through it so fast that I honestly couldn’t tell you the exact shelf life… but it easily lasts a month in the cupboard in a sealed jar!

    This is one recipe pair you’re going to want to keep forever.


    🧇 Homemade Waffle Recipe

    Ingredients

    • 2 ¼ cups flour
    • ¼ cup sugar
    • 1 tablespoon baking powder
    • ½ teaspoon salt
    • ½ cup butter (melted)
    • 2 cups milk
    • 2 eggs
    • 2 teaspoons vanilla

    Optional add-ins:

    • Chocolate chips
    • Blueberries
    • Cinnamon
    • Chopped nuts

    🧇 How to Make the Waffles

    If you’ve followed my cooking style for any amount of time, you know what’s coming…

    Just toss everything in a bowl and mix it well.
    That’s it.

    No separating eggs, no beating egg whites, no mixing dry and wet ingredients in two different bowls. One bowl, one spoon, one happy cook.

    Once your batter is smooth, let it sit while your waffle iron heats up. Cook according to your waffle maker’s instructions—usually 3–5 minutes per waffle.


    🍁 Homemade Maple Syrup Recipe

    This syrup comes together so fast you won’t believe it, and it tastes way better than the store-bought versions—especially if you use the maple extract.

    Ingredients

    • 1 cup water
    • 2 cups sugar
    • 1 teaspoon molasses
    • ½–1 teaspoon maple extract
    • 1 teaspoon vanilla (optional, but makes it taste more “store bought”)

    🍯 How to Make the Syrup

    1. Bring water to a boil in a saucepan.
    2. Add sugar and molasses, stirring until dissolved (about 2 minutes).
    3. Remove from heat and stir in maple extract and vanilla (if using).
    4. Let it sit and thicken as it cools.

    That’s it!
    You just made homemade syrup in minutes.

    It stores beautifully in a sealed jar in your cupboard for up to a month—although in my house, it never lasts anywhere near that long because my youngest is obsessed with waffles.


    💛 Put It All Together

    My favorite thing about this combo is how perfectly the timing works out. Usually I start the syrup while the first waffle is cooking. By the time the last waffle comes off the iron, the syrup has thickened, cooled just enough, and is ready to drizzle.

    Fluffy waffles + warm homemade syrup = happy family.

    If you give these recipes a try, let me know what you think! I love hearing when other families enjoy these cozy homestead meals as much as we do.

  • Budget Friendly Homestead Recipes

    Budget Friendly Homestead Recipes

    As a homesteader, one of the most rewarding aspects of our lifestyle is the ability to grow your own food. But, even with a garden full of fresh produce, the reality of cooking for your family can still be a challenge when it comes to budgeting. That’s where budget-friendly homestead recipes can come into play. These recipes make the most of what you already grow, raise, or preserve on your homestead, allowing you to cook hearty, wholesome meals without breaking the bank.

    By focusing on simple, cost-effective ingredients that you can harvest yourself or purchase locally, you can cut down on grocery store expenses while still enjoying delicious, nutritious meals. Here are some budget-friendly homestead recipes that will help you make the most of your homestead harvest while saving you money.

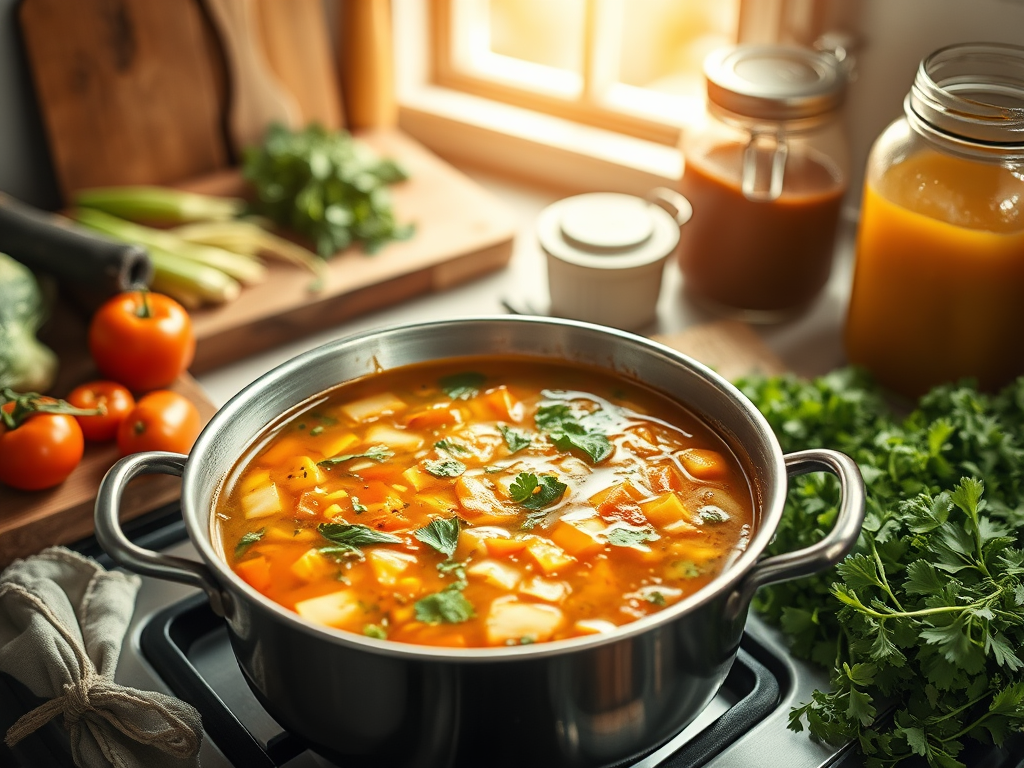
    Vegetable Soup: A Homesteader’s Classic

    When you have an abundance of vegetables from your garden, one of the easiest ways to use them up is by making a large pot of vegetable soup. Not only is it hearty and comforting, but it’s also a versatile dish that can be customized based on what you have on hand.

    Ingredients: Whatever vegetables are in season (carrots, potatoes, tomatoes, onions, zucchini, kale, etc.), garlic, vegetable or chicken stock, and herbs like thyme or rosemary. You can also add dried beans or lentils to stretch the meal and add protein.

    How to Make It:

    1. Chop up your vegetables and sauté garlic and onions in a large pot with some olive oil or butter.
    2. Add the chopped vegetables, stock, and herbs, and bring it to a boil. Then, let it simmer for 30-45 minutes until all the veggies are tender.
    3. For a heartier soup, add beans or lentils, which are both cheap and filling.

    Tips for Saving Money: Use what you have in abundance! You can freeze any leftover soup to eat later. Adding inexpensive grains like rice, barley, or oats also stretches the meal and adds fiber.

    Vegetable soup is a great way to use up leftover produce and can be made in large batches to feed a crowd or provide meals for the week ahead.

    Homemade Chicken or Veggie Stock

    Making homemade stock is one of the best ways to utilize parts of animals or vegetables that might otherwise go to waste. Chicken bones, vegetable scraps, and herb stems can be simmered together to create a rich, flavorful stock that you can use in soups, stews, or risottos.

    Ingredients: Chicken bones or vegetable scraps (onion peels, carrot ends, celery stalks, etc.), herbs like thyme, rosemary, bay leaves, and peppercorns.

    How to Make It:

    1. Place your chicken bones or veggie scraps into a large pot and cover with water.
    2. Add your herbs and seasonings, then bring it to a boil.
    3. Reduce the heat and let it simmer for at least 2 hours (the longer, the better). For a richer flavor, you can simmer the stock for 6-8 hours.
    4. Strain out the solids and store the stock in containers for later use. You can freeze stock in ice cube trays for easy portions.

    Tips for Saving Money: Making stock from leftover scraps means you’re reusing parts of food that would have been thrown away. Plus, you’ll have a flavorful, homemade stock on hand for cooking at no extra cost.

    Homemade stock enhances the flavor of many dishes, adds nurtrients and is a great way to utilize what would otherwise be food waste.

    Cabbage Stir-Fry with Eggs

    Cabbage is one of the most budget-friendly vegetables you can grow on your homestead, and it can be turned into a delicious, hearty meal with just a few ingredients. This cabbage stir-fry recipe is simple, filling, and perfect for when you’re looking for a quick meal that stretches your food supply.

    Ingredients: Cabbage (shredded), eggs, soy sauce (or homemade if you have the ingredients), garlic, and any leftover vegetables or herbs you have in the fridge.

    How to Make It:

    1. Heat oil in a large skillet and sauté garlic until fragrant.
    2. Add the shredded cabbage and cook, stirring occasionally, until the cabbage wilts and caramelizes slightly.
    3. Push the cabbage to the side of the skillet, crack eggs into the pan, and scramble them.
    4. Once the eggs are cooked, stir everything together and season with soy sauce or your preferred seasoning.

    Tips for Saving Money: Cabbage is incredibly affordable and lasts a long time in storage. This recipe is also versatile, so you can throw in any extra vegetables or meat scraps to give it a little more variety.

    This simple stir-fry can feed a family and uses up those extra heads of cabbage you may have growing in your garden.

    Homemade Bread (No-Knead or Basic Loaf)

    Bread is a staple in many homesteads, and making your own is not only satisfying but also budget-friendly. Homemade bread can be made with just a few basic ingredients that you likely already have in your pantry, and it can be baked in large batches to feed the whole family.

    Ingredients: Flour, yeast, salt, water, and a bit of honey or sugar (optional).

    How to Make It:

    1. Combine your dry ingredients (flour, salt, yeast) in a large bowl.
    2. Slowly add water and mix until you form a sticky dough.
    3. Cover and let it rise for 12-18 hours (a slow rise improves flavor).
    4. After the dough has risen, fold it over a few times, shape it into a loaf, and bake in a preheated oven (450°F) for about 40-45 minutes.

    Tips for Saving Money: Making bread from scratch is a fraction of the cost of store-bought loaves, and you can bake it in large quantities to freeze for later. You can also experiment with adding in herbs, cheese, or even leftover grains to flavor your bread.

    Homemade bread is an essential homestead recipe that not only saves you money but also provides a comforting, fresh side to any meal.

    Simple One-Pot Stews or Casseroles

    One-pot meals are the ultimate homesteading hack for saving time and money. You can throw together a variety of vegetables, grains, and meats (or beans) into one pot to create a delicious and filling meal that serves a crowd.

    Ingredients: Leftover vegetables, grains like rice or barley, beans or lentils, and your choice of protein (chicken, pork, beef, or a plant-based option). Season with garlic, onions, and herbs from your garden.

    How to Make It:

    1. In a large pot, sauté onions and garlic, then add in your protein (if using) and cook until browned.
    2. Add in your vegetables, grains, and beans, then cover with broth or water.
    3. Bring to a boil, then simmer until everything is tender and the flavors have melded together (about 45 minutes to an hour).
    • Tips for Saving Money: These dishes are perfect for using up whatever leftover ingredients you have in your fridge or garden. You can make a big batch to last the week and freeze portions for future meals.

    One-pot meals are an efficient way to make a hearty, cost-effective meal that stretches your homestead ingredients.

    Conclusion

    Cooking on a homestead doesn’t have to be expensive or complicated. By focusing on what you grow or raise yourself, you can create delicious, wholesome meals that are easy on your budget. Simple ingredients like vegetables, grains, and herbs can be transformed into flavorful dishes that provide nourishment and satisfaction to your family.

    The key to saving money is planning your meals around what’s in season, making the most of leftovers, and incorporating affordable staples like beans, rice, and cabbage into your recipes. By following these budget-friendly homestead recipes, you’ll be able to feed your family well while sticking to your homestead’s budget.

    Start incorporating these cost-effective meals into your routine and watch how much money you can save. Not only will you have a stockpile of healthy, homemade food, but you’ll also develop a deeper appreciation for the fruits of your labor.

    I hope this article helps you showcase how easy and rewarding it is to create budget-friendly meals on a homestead! Let me know if you want to adjust anything or add any specific recipes.

  • Is Meal Prepping Worth It?

    Is meal prepping truly worth it? In our busy lives, balancing work, family commitments, social activities, and personal aspirations often leaves little room for maintaining a nutritious diet. After a long day, the temptation to stop at a fast-food restaurant can be hard to resist.


    Yet, an effective strategy exists that can transform your approach to cooking: meal prepping. This method not only helps you save valuable time but also alleviates stress, while ensuring that you’re consistently enjoying wholesome, home-cooked meals. This article will guide you through the essentials of meal prepping and illustrate how it can revolutionize your week. Furthermore, we’ll explore whether it’s the right choice for you and your household.

    Understanding Meal-Prepping; What exactly is it?

    Preparing meals in advance, known as meal prepping, enables individuals to save time and reduce stress during busy weeknights. This method involves several steps, including planning menus, shopping for ingredients, cooking dishes, and properly storing the finished meals. By organizing your culinary tasks ahead of time, you can streamline your eating habits, allowing for the enjoyment of wholesome, home-cooked dishes every day without the pressure of fitting cooking into a packed schedule. With this strategy, mealtime becomes a stress-free experience, fostering a healthier lifestyle and better time management.

    What are the Benefits of Meal Prepping?

    Time Efficiency: Cooking can be time-consuming, but by dedicating a few hours once a week to meal prep, you can create enough dishes to last through the days ahead. This strategy minimizes kitchen visits and cuts down on cleaning efforts significantly.


    Portion Management: Meal prepping empowers you to manage your serving sizes effectively, facilitating adherence to healthy dietary habits and helping with calorie control.


    Nutritional Convenience: With some forethought, preparing your meals in advance guarantees that wholesome options are readily available, decreasing the likelihood of turning to fast food or unhealthy snacks.


    Cost Savings: Planning your meals and purchasing ingredients in larger quantities can lead to considerable financial savings when compared to frequent takeout or restaurant dining.


    Minimized Food Waste: By outlining your meals ahead of time, you can avoid overbuying and ensure that food doesn’t end up discarded, thus contributing to a more sustainable approach to eating.

    The Downsides to Meal-Prepping

    Significant time commitment: Engaging in meal prepping often demands a substantial investment of time at the outset. From brainstorming meal ideas to grocery shopping and actual cooking, you can easily spend several hours readying yourself for the week ahead. For those with limited time, this undertaking can appear daunting.


    Monotony of meals: A frequent concern surrounding meal prepping is the uniformity it brings. Consuming the same dishes multiple times each week can become tiresome, leading to what’s often referred to as “food fatigue.” This boredom might push you to seek takeout alternatives instead of sticking to your meal plan.


    Storage limitations: Efficient meal prepping requires adequate storage space in your refrigerator and kitchen. If your fridge is on the smaller side, finding room for numerous prepped meals can be challenging. Furthermore, the expenses associated with buying reusable containers can accumulate, and the tasks of cleaning and labeling them may begin to feel burdensome.


    Food safety issues: With meal prepping, some dishes inevitably remain in your refrigerator for several days. Improper storage and handling can heighten the risk of foodborne illnesses. Additionally, some individuals simply prefer not to eat leftovers, which can render meal prepping an impractical choice for them.


    Decreased spontaneity: Committing to meal prepping establishes a fixed schedule, which can pose inconveniences if your plans change or if you crave something different. This lack of flexibility makes it difficult to adapt to unexpected social engagements or sudden cravings.

    Weighing the benefits of meal prepping: Is it truly worthwhile?

    Is meal prepping worth it? The answer largely depends on your individual lifestyle and preferences. For many people, meal prepping can significantly improve daily routines. It saves time throughout the week, alleviates mealtime stress, and fosters healthier eating habits by making it easier to avoid quick, unhealthy choices. However, if you thrive on flexibility and derive joy from cooking creatively, adhering to a strict meal prep schedule might feel burdensome rather than advantageous. Ultimately, assessing whether meal prepping suits your lifestyle requires reflection on your preferences and needs. For numerous individuals, this approach leads to more deliberate eating habits and a sense of calm during busy days.


    Do you engage in meal prepping? Share your thoughts below, and if you’re considering diving into this practice, check out this article for guidance on getting started.